Accuracy in Action: How Robots Learn and Perform Tasks
At IRELEC, we are breaking new ground in robotic accuracy with a unique calibration technique tailored to meet individual customer needs.
We look at the robotic work cell and payload for each situation to ensure flexible calibration, whether it’s for the entire workspace or a restricted volume.
Our R&D has resulted in accuracy values below 100 µm using a Stäubli TX2-90L robot arm even under a 10 kg load, setting a new standard in robotic accuracy and performance.
Accuracy and precision, two closely intertwined yet different concepts
When it comes to measurement, the concepts of accuracy and precision play pivotal roles. Accuracy reflects how close a measurement is to its “true” value, a benchmark that is universally accepted (i.e., a standard or a known, expected model). The difference between the mean of a set of measurements and the “true” value indicates how accurate a measurement is. But accuracy should not be confused with precision, which is a different, yet closely related concept.
Precision is a description of random errors which may arise from one measurement to another. It reflects the degree of variability in a set of measurements repeated under unchanged conditions.
In other words, accuracy has to do with bias, whereas precision is associated with variance.
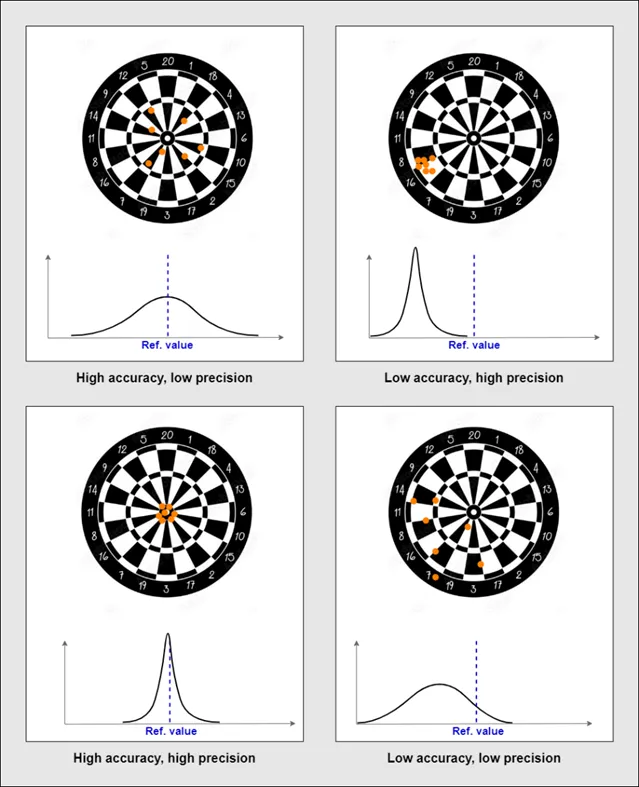
Accuracy and precision are independent concepts, as a set of measurements could be accurate and imprecise, inaccurate and precise, both accurate and precise, or neither accurate nor precise.
A classic visual representation of these two concepts is the dartboard. The darts could be said to hit the target with a high level of accuracy if they averaged out to be in or very near the bullseye. They could be said to hit the target with a high degree of precision if they landed close to each other, but not necessarily in the bullseye.

What accuracy means in robotics?
In robotics, positioning accuracy is the error between the requested point to reach and the measured position actually reached by the robot. Precision, more commonly referred to as repeatability, is the robot’s ability to consistently reach the same given position.
Although most industrial robots offer excellent repeatability, they often lack accuracy. This is not necessarily an issue when the robot is used for simple repetitive tasks, where the points to be reached can be known in advance. For example, if a task only requires moving from point A to point B, and then back to point A, both points could be taught manually (i.e., the operator could simply guide the robot towards its desired position using a handheld robot programming device called a teach pendant, and save its corresponding joint positions). As the robot is said to be “repeatable,” it would be able to reach those points again and again with a low random error rate, and the task would be completed successfully.
However, high repeatability alone is no longer enough when the points to be reached cannot be memorized in advance, as is the case in the following situations:
- The points to be reached are transmitted to the robot in real time by an external device, for instance a camera detecting parts to be gripped.
- A task involves a large number of points—such as drilling thousands of holes on a surface—and manually teaching them would be tedious.
Since the positioning error of industrial robots can sometimes exceed 1 mm, the successful completion of certain tasks could be compromised by this lack of accuracy.
Understanding the factors that can hinder robot accuracy
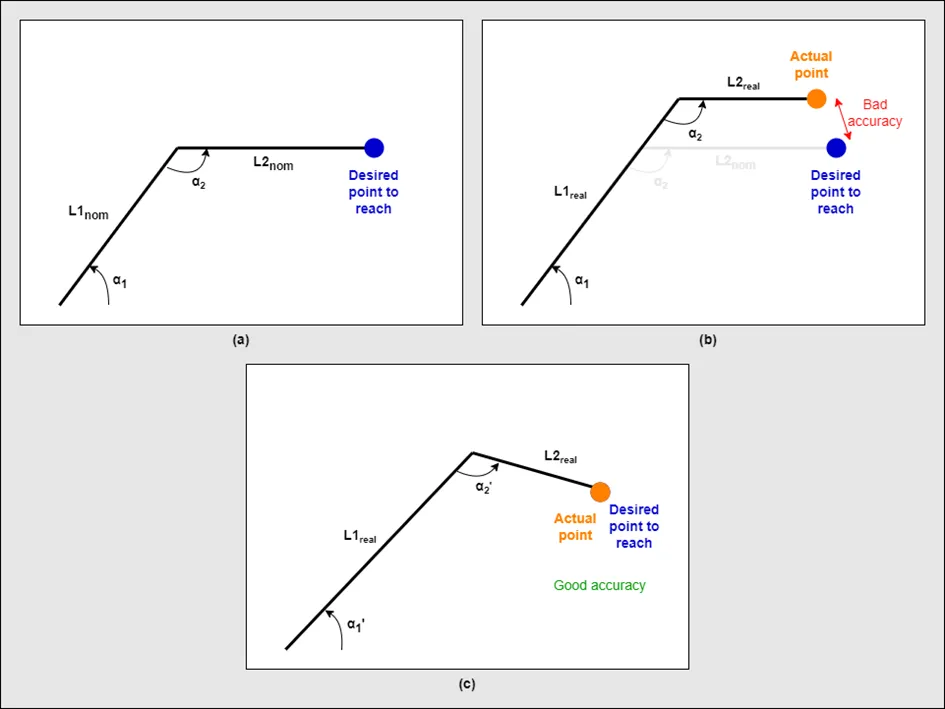
Due to manufacturing tolerances and assembly errors, the nominally specified dimensions of a robot will differ from its actual ones. Given that, by default, the nominal model is used by the robot controller to calculate Cartesian positions from axis values and vice-versa, a discrepancy will occur between the position the robot thinks it has reached and its real position, leading to inaccuracy.
These uncertainties about the parameters describing the robot’s geometry are the main source of positioning errors. However, even with a geometric model as close to reality as possible, other sources of inaccuracy arise.
In particular, the bending deformations undergone by the robot links under the effect of their own weight and the mass of the tool can produce a deflection of the end-effector likely to considerably degrade accuracy.
Temperature variations, which cause the robot links to expand and contract, are also a major source of inaccuracy.

A simple two-link planar arm, with the nominal axis lengths L1nom and L2nom . (a): Using the nominal model, the axis angular positions a1 and a2 are calculated to reach the desired position. (b): As the real robot geometry differs from its nominal one, the joint positions a1 and a2 lead to a positioning error of the robot end-effector. (c): Better accuracy would be achieved with angular positions a’1 and a’2 which require an accurate identification of real axis lengths L1real and L2real to be calculated.
Improving robot accuracy through calibration
Calibration refers to the process used to improve robot accuracy. As geometrical errors lead to inaccuracy, it is crucial to identify parameters that describe the real robot geometry.
The Denavit-Hartenberg (DH) notation is generally used to solve this problem. A coordinate frame is attached to each of the robot joints in such a way that the relative position and orientation—known as the transformation—of two successive frames can be expressed by means of only two rotations and two translations, representing four DH parameters. Once the frames have been established, the position of the end-effector with respect to the base frame is derived in a recursive way, by concatenating all transformations between successive frames.
Kinematic calibration consists of identifying a set of DH parameters (for a 6-axis robot, there will be 24 parameters), minimizing the error between positions calculated from the geometric model and positions actually reached by the end-effector. This kind of calibration entails placing the robot in a range of joint positions and recording the corresponding end-effector positions with an external metrology system, like a laser tracker. Optimization methods, such as the least-square method, are then used to solve the positioning error minimization problem. The joint positions used for calibration must be carefully chosen to best characterize the robot’s workspace. If good accuracy is only required in a restricted volume, local calibration with positions chosen in this volume can also be considered.
To reduce positioning errors unrelated to robot geometry, non-kinematic calibration techniques can be developed. Their goal is to establish a more elaborate physical model of the robot, taking into account parameters such as joint compliance, gear backlash, and temperature.
Since explicitly identifying physical parameters can be complex, model-free approaches have also been developed to map positioning errors across the workspace in order to compensate for them directly.
The limitations of calibration
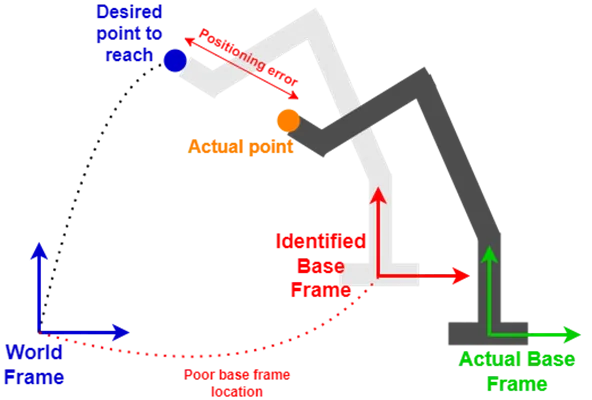
Some robot manufacturers offer kinematic calibration services. For customers, one difficulty remains when using a calibrated robot: locating the base coordinate system, which is crucial to ensure interaction between the robot and its environment. Poor knowledge of the robot base frame coordinates with respect to the world frame in which the points to be reached are expressed means that these points will be incorrectly located in relation to the base frame, leading to positioning errors, even if the robot itself is accurate.
Not only does the use of a calibrated robot involve accurate identification of its base coordinate frame; it also requires temperature conditions similar to those in the calibration phase; otherwise, the effects of dilation or contraction would invalidate the geometric model established by calibration. Since kinematic calibration is usually performed with a very low payload, bending deformations associated with a higher payload could also limit the performance of calibrated robots.

Poor estimation of the Base-World transformation, leading to a shift of the desired point coordinates with regard to the actual base frame and resulting in positioning errors.
How Irelec is addressing calibration for improved accuracy
At IRELEC, we have dedicated substantial R&D to overcoming these obstacles to robot accuracy. Our unique calibration method offers several advantages:
- A reproducible procedure for identifying the robot base coordinate frame to ease installation and maintenance of the robot.
- A calibration tailored to each customer, taking into account the robot work cell and payload, with the option of calibrating in the entire workspace or in a smaller restricted volume.
Using this approach, we have achieved accuracy values below 100 µm with a Stäubli TX2-90L robot arm with a payload of up to 10 kg.